In case someone has no coding experience and would like to edit fields in their store via BigCommerce Admin Panel, here is how you could help them by developing the functionality in the theme files, which would allow them to easily edit it from the Admin Panel.
Final Result: https://prnt.sc/1rhmk17

Read this blog till the end, every step would guide you with the help of reference screenshots which would make it easier for you! Let’s jump into it.
Assuming your stencil theme is ready in your local environment. If you are wondering how to do the local setup of a BigCommerce stencil theme, you could follow the steps from the BigCommerce article and do the local setup of your stencil theme.
Reference Link: https://developer.bigcommerce.com/stencil-docs/installing-stencil-cli/installing-stencil
Now that you have the theme in your local environment, let’s begin with the work.
Adding a Text, link, and background color to your website’s home page which could be changed monthly from the BigCommerce Admin panel without editing any files in the theme.
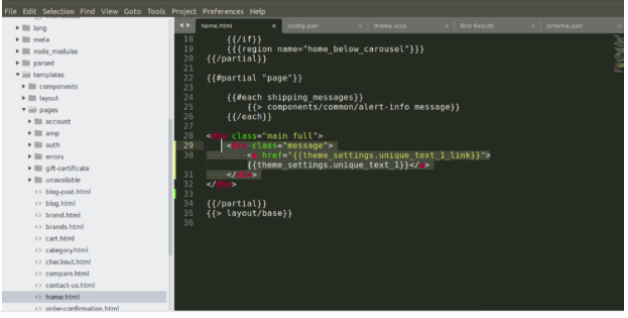
- Traverse to the home.html page of your theme, In case you are using the cornerstone theme here, is how you could traverse to the file templates/pages/home.html.
- Open the HTML tag in which you would like the text to get displayed, the handlebar object you would be referring to will take you to the config.json file in your theme where you have to specify the content.
Code Snippet Reference Image: https://prnt.sc/1rhbs81
- {{theme_settings.unique_text_1}}, unique_text_1 is the name of the id you would be referring to for the text, it could be named anything of your choice.
- {{theme_settings.unique_text_1_link}}, unique_text_1_link is the name of the id you would be referring to for the link, it could be named anything of your choice.
- The field “color-message” is added in the config.json file for choosing the background color via the admin panel, you will know how to implement this at the end of this blog.
How to edit the config.json fileTraverse to the config.json file in your theme and move down to the settings array, here you will have to specify the content for the IDs you have set in the home.html file. Refer to the code snippet image attached below.Code Snippet Reference Image: https://prnt.sc/1rhcuu6 Now that you have edited the config file, to see the changes getting reflected in your local environment you will need to re-run the stencil init command in your terminal. The output of your local environment would look like this – https://prnt.sc/1rhf7zz
 So the first step is complete, you have edited the config.json file and have bought the contents to get reflected in the front end, next thing we need is to get the fields editable from the customize section of the BigCommerce Admin Panel. The file you will need to edit for getting this done is the schema.json file. How to edit the schema.json file, so as to get the fields reflected in the BigCommerce Admin Panel. Traverse to the schema.json file in your theme and find the Home Page array, here you would need to specify the field types you would like to get reflected in the Admin Panel. Here what field types we need are :“heading”- This type will reflect a heading in the admin panel specifying the content.“text” – For the Message field and link.“color”- Swatch needed for the background color.Next in the array you should add a label for the fields and specify the id names you have used in the home.html file, which has been mentioned in the config.json file also. Refer to the code snippet attached below. Code Snippet Reference Image: https://prnt.sc/1rhftl0
 How to get the color used in schema.json and config.json file reflected in the CSS file. You might have noticed that we used a color field inside the config.json and schema.json file, you will need to call the id used in the CSS file of your theme. Here is how it should be specifiedbackground-color: stencilColor(“color-message”);
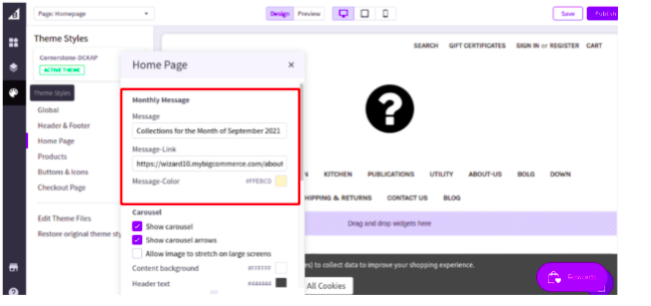
 Code Snippet Reference Image: https://prnt.sc/1rhi6sxIf you followed all the steps mentioned above, you would successfully get the fields reflected in your BigCommerce admin panel. Let’s go ahead and give the command stencil bundle inyour terminal, this would create a zip file of your theme, go ahead and upload the theme in your BigCommerce admin panel.Once the theme has been successfully uploaded, just apply it to the store. And then click the Customize button. Which would open the page builder of BigCommerce.Reference Image: https://prnt.sc/1rhlom2
 Traverse down to Theme Styles->Home Page, You could see all the fields you have made and uploaded in the theme files getting reflected in the theme styles. Someone with no knowledge of coding would just change the fields from here without directly editing the theme files, which could at times lead to breaking the theme styles entirely if the coding is not proper. So this blog has given you a way to safely edit the fields in BigCommerce. The only limitation here is that the field text value length in the config.json should not exceed 64 characters. This would throw an error TR-4400 while uploading the theme. Our BigCommerce experts are right here for you to implement the perfect services for your business.


